WebLink URLs
![]() WebLink URLs property box allows you to configure WebLink URLs that the Generate WebLink URLs activity will turn into tokens. You can then use those tokens later in the workflow definition.
WebLink URLs property box allows you to configure WebLink URLs that the Generate WebLink URLs activity will turn into tokens. You can then use those tokens later in the workflow definition.
Note: You can only create 8 tokens with a single Generate WebLink URL activity.
To configure the WebLink URLs property box
- Add the Generate WebLink URLs activity to your workflow definition by dragging it from the Toolbox Pane and dropping it in the Designer Pane.
- Select the activity in the Designer Pane.
- In the Properties Pane, under WebLink URLs, click Add.
- In the
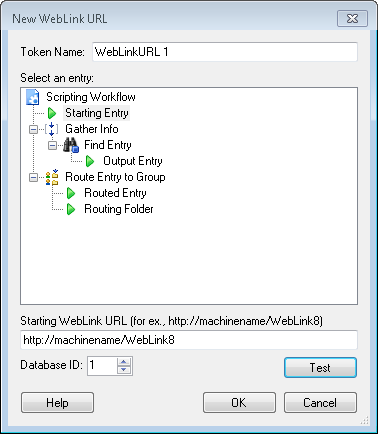
 New WebLink URL dialog box, type a name for your WebLink URL token next to Token Name.
 - Select the entry for which you want to create a WebLink URL.
- Under Starting WebLink URL, type the URL for your WebLink Start Page. (For example, http://machinename/WebLink9)
- Use the scroll box (up-and-down arrows)
 to select the Database ID number of the repository in which the entry is stored. During configuration, WebLink automatically assigns a repository an ID number. Learn more about WebLink help files.
 - Optional: Click Test to ensure the Starting WebLink URL is entered correctly.
- In the Starting URL Test dialog box, select the Connection Profile of the repository that will contain the entry this activity will access.
- Specify the Entry ID number of an entry in the repository selected above.
- Click OK.
- If the Starting WebLink URL is configured correctly, WebLink will open the entry with the ID you specified.
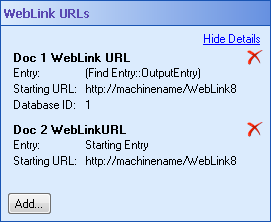
- Optional: You can add to and organize your custom tokens in the
 WebLink URLs property box in the Properties Pane.
 - Hide the entry and Starting URL details in the WebLink URLs property box by clicking Hide Details.
- Modify a WebLink URL token by clicking on the token's name or details.
- Create additional tokens by clicking Add.
- Delete a token by clicking the red X
 .
.


